This post contains affiliate links that I earn a small commission from at no cost you. I only recommend products I use in real life. All product opinions I express are my own
If you’re planning your first European solo adventure, you’re probably feeling a mix of emotions. Excitement, worry, curiosity, anxiousness…aIl of these things come with the unknown of embarking on a new adventure.
I spent a TON of time planning and researching my first solo Europe trip, and have since gone to Europe solo multiple times. I’ve learned a lot from my travels, and now, I’m sharing my top tips for female solo travel to Europe with you here!

I am a HUGE advocate for female solo travel, even if you just do it once. The beauty of solo travel is you can do whatever you want and explore the city on your own terms. The result is you have a trip, memories, and experiences that are uniquely yours. Not only that, but the confidence you gain is unmatched.
When I came back from my first solo Europe adventure, I remember feeling like I could conquer the world. I just navigated a foreign country by myself! I couldn’t speak the language, didn’t know anyone personally that I could reach out to, and the cobblestone streets and names were as foreign to me as I was to them.
But I did it! And not only did I do it, but I had the TIME OF MY LIFE doing it. And I’m going to inspire you to do it too.
In order to enjoy traveling solo, you need to feel safe and confident. This blog post comprises 13 of my best solo female travel tips so you can step off the plane without a worry in the world…except, maybe where your first glass of authentic Paris champagne is coming from.
Get Your Freebie Now!
As a bonus for coming to this page, I’m giving you the link to my FREE eBook,
“The 6 Essential People You Meet While Traveling Solo.”
Female Solo Travel to Europe: Tips for Your First Trip
Jump to Section
- Start By Going With a Travel Group
- Register with the U.S. Embassy’s STEP Program
- Network, Network, Network!
- Read a Blog Post to Plan Your Trip
- Know What Part of the City You Need to Stay In
- Know How You’re Getting Around
- Book Some Fun Activities in Advance
- Have the Right Credit Card (and Bring Cash!)
- Beware of Pickpockets
- Be Open to Meeting (and Learning From) New People
- Trust Your Instincts
- Set Your Boundaries
- Tips for Navigating a Foreign Language
Solo Travel to Europe
The Best Solo Travel Destinations
1. Start By Going With a Travel Group
If you want to travel out of the country but the thought of being across the world AND alone sends you over the edge, signing up to go with a travel group is a great choice.
When you go with a professionally organized group, you will have a tour guide that takes you through your chosen destination and shows you everything from the top tourist attractions to the “hidden gems” only locals know about. Travel groups take care of your hotel reservations and provide you with day by day itineraries. Some of them even book your flights for you! You literally just have to pack your suitcase and show up.
I mention throughout this website that Barcelona was the first trip I ever took completely solo, but what you should also know is that I had booked a group trip to Greece before my Barcelona trip started. I did 10 days in Greece with EF Ultimate Break, and then did 4 days in Barcelona completely solo. By the end of my Greece trip, I was absolutely comfortable going to Barcelona alone.
- Related Post: My (Honest!) EF Ultimate Break Tour Review
Going with a travel group is a fantastic way to learn how to travel overseas by yourself. Not only that, you will meet a TON of new people that you can get to know! When I was on my EF group trip to Greece, I was put in a room with two other girls who I instantly became friends with. The three of us have traveled to multiple destinations together, and I couldn’t imagine my life now if I hadn’t met them!

- Pro Tip: I have gone on two trips with EF Tours: one in high school, and one as an adult. I had a fantastic experience both times! EF has two main classes of tour groups: Ultimate Break (ages 18-35), and Go Ahead Tours (any age).
My Top Tip for Group Travel
If group travel is your first exposure to being out of the country and you really want to feel comfortable solo traveling, my biggest piece of advice is to take advantage of your tour guide and ask questions. This person will have likely traveled to multiple countries and can give you helpful information about where to go and what to do!
In Europe, the majority of people use WhatsApp, which is a free text messaging service that doesn’t require data to use. I recommend saving your tour guide’s contact info in WhatsApp and reaching out if you have questions about planning a future trip. I still communicate with my tour guide from Greece this way!
2. Register with the U.S. Embassy’s STEP Program
Any time I go on an international trip, I ALWAYS register with the U.S. Embassy’s Smart Traveler Enrollment Program (STEP). To quickly find the link, I type “US Embassy STEP” into Google.
There is a US Embassy in almost every foreign country. The purpose of the US Embassy is to keep United States citizens safe and informed in these foreign countries. Enrolling in the STEP program adds an extra layer of protection.
There are 2 main reasons why I recommend enrolling in STEP before your trip:
1. The US Embassy’s STEP program helps make you aware of any potentially dangerous situations.
In case of natural disasters, civil unrest, or any unforeseen emergencies in your destination country, the U.S. Embassy will have a way to reach out to you directly.
This ensures that you receive timely alerts and assistance, helping you make informed decisions to protect yourself and adjust your plans if needed.
2. The US Embassy’s STEP Program Can Help You in a Personal Emergency
STEP provides the US Embassy with your contact information and travel details. This makes it easier to locate and assist you in case of a personal emergency, such as a lost or stolen passport.
I can’t think of too many things that would be worse than losing my passport on a trip. If the US Embassy already has your information on file, they can assist you much quicker in this type of emergency.
The Biggest Thing to Know When Registering with STEP
I wanted to show you the type of message that you could get after registering for STEP just because I think it could be alarming for some travelers to book their trip and then see something like this:
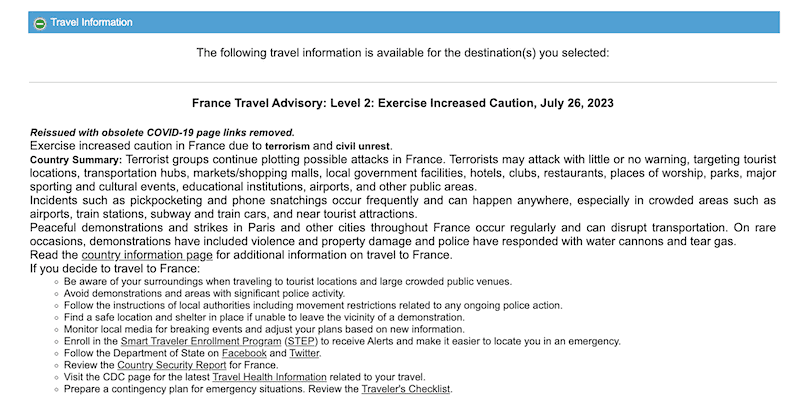
I have gotten this warning in every single country I have registered with and I have ALWAYS been fine. Keep in mind that a Level 2 Travel warning can signify an increased risk but doesn’t necessarily imply “do not travel.”
Most European countries are INCREDIBLY safe and do not have an overly high risk of terrorism. If I ever truly question the safety of a country, I use this opportunity to network (see next section!) and ask questions. I talk to people who have been there, people who have gone recently, and even my military friends who go overseas!
Now, you might be wondering: “what’s the point of registering if you get this warning that you can essentially ignore?”
If there ever was an ACTUAL threat in the country you were visiting while you were overseas, you would be informed by the US Embassy and you would get instructions on what you needed to do. I take these warnings as a precaution – after all, there’s always a risk of terrorism in today’s world no matter what – but unless I know there’s an active threat, war, or something else going on, I feel safe to go.
My First Time Registering with STEP
The first time I registered with STEP was when I traveled to Greece and Spain in 2021. Both countries were classified as a Level 4 “Do Not Travel” due to COVID.
BUT – I felt comfortable traveling because I did my research: I was going with EF Tours, and if major tour group companies like that were conducting trips, then I felt like it was safe enough to go.
I learned what precautions were in place, what the risks were, where and when I needed to get COVID testing.
I talked to people, I asked questions, and at the end of the day, I felt comfortable going. Oh – and I had the time of my life and zero regrets.
3. Network, Network, Network!
If you do nothing else from this post, I hope you at least do this.
Networking is arguably THE most important thing that has helped me in life period. When it comes to taking solo trips, networking is one of the best things you can do to become a confident solo traveler.
No doubt, you know people who have traveled abroad and to the destination(s) you are planning to visit. Reach out and ask them questions. Where did they stay? How did they get around? What would they recommend doing? Is there anything you need to worry about? Any advice they would give you?
Before my first solo trip, I asked a TON of questions…and not just to one person, either. I reached out to a few people who had been overseas and got different perspectives for traveling abroad and what I needed to do. As a result, I felt very prepared for my trip.
I loved learning from other people when I was an inexperienced traveler, and now I love being someone that inexperienced travelers can reach out to with questions! If you have any questions related to travel, drop them in the “Contact Me” section at the bottom of this post!
4. Read a Blog Post to Plan Your Trip
Am I biased here? Maybe. Or maybe I just know what I’m talking about ;).
I planned my first solo Barcelona trip off of an itinerary I found on a couple’s travel blog. I followed their advice for each day, and I can honestly say my trip was perfect. Seriously. Not ONE thing went wrong! I loved their restaurant recommendations, the buildings they suggested I tour, and how they spoke about Barcelona in general. Thanks to their blog post, I felt very prepared for my trip.
Because of this, it really inspired me to write some blog posts in itinerary format, especially for European travel. As a solo traveler, I feel like having a plan puts me at ease. Plus, my itinerary blog posts (along with the rest of my content) all include tips, stories, and advice I gained from personal experience.
To check out my European itinerary posts and start planning your trip, visit the Itineraries link here!
5. Know What Part of the City You Need to Stay In
If you’re an avid reader of this blog, you’ve heard me preach this a thousand times: it is best to stay as centrally located as possible to the things you want to do.
BUT! You also want to make sure where you’re staying is safe. This is where the networking, reading blog posts, and researching comes in. I always make sure I read the hotel reviews and take note when people mention the location being good.
A lot of times, I will figure out what all I want to do in a destination and THEN book my hotel. Other times, I will book my hotel in reference to a certain popular landmark or well-known street (for example, staying near Tower Bridge in London or Gran Via in Madrid).

6. Know How You’re Getting Around
Before you go to a new city, it’s a good idea to research the best way to get around. Is there public transportation (a subway/metro system)? Do you need to Uber everywhere? Better yet, is the city walkable, saving you money on transportation?

A good way that I have found to quickly assess public transportation in a city is to pull up Google maps and try and figure out how to get somewhere. For example, if I am going to Paris, I know two major attractions there are the Eiffel Tower and the Louvre. I can type both in to Google maps as my starting point and destination point and see what options it gives me.
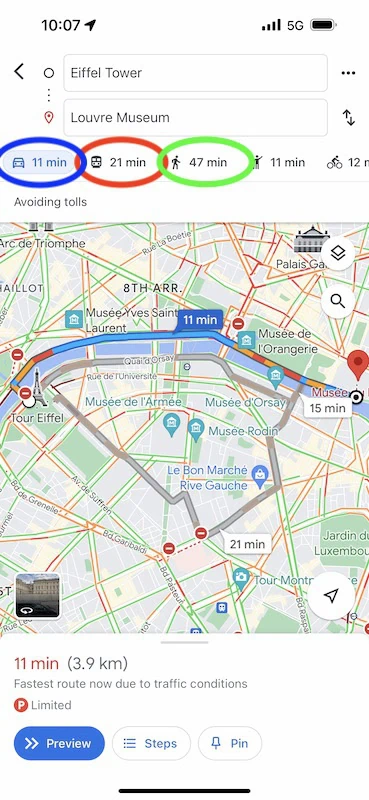
You can see from the above screenshot circled in RED that you can take public transportation to get from the Eiffel Tower to the Louvre. This icon will give you options for taking the subway or metro as well as taking the bus. (Of course, the route for an Uber is circled in BLUE, and walking is circled in GREEN.)
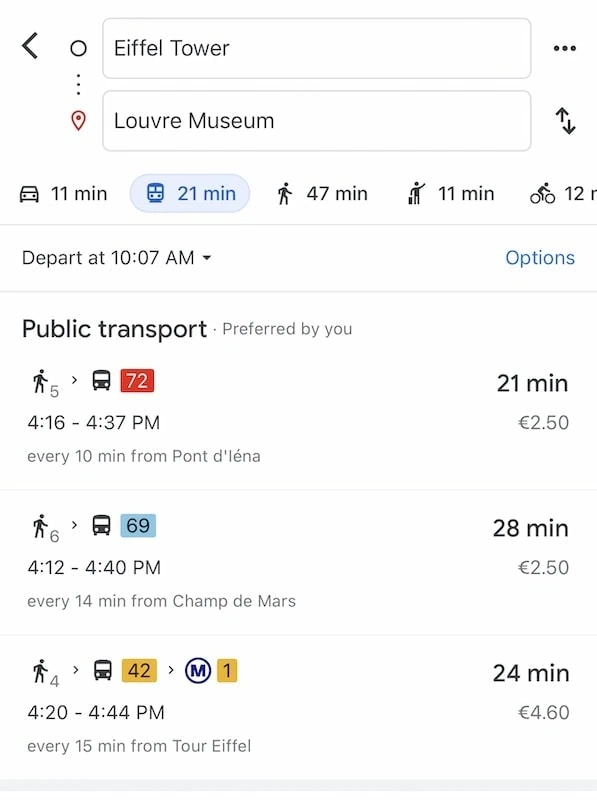
If I select the public transportation option, it gives me the estimated time to my location and the prices. It’s important to remember that the “M” icon means metro or subway, and the bus icon indicates a bus route. If I have both options available to me, I try to take the metro if I can because I find it easier.
My Top Tip for Knowing How to Get Around
When I go to a new city, I ALWAYS want to find out if they have a metro system. Any time I can take public transportation in the form of a metro or subway, that’s usually what I will do. It is cheaper than Uber and will get me to my destination faster than walking.
7. Book Some Fun Activities in Advance
Every time I go on a trip, I always book at least one activity through Get Your Guide or Viator. I partially do this because, duh, they’re super fun – but also because it’s a great way to meet people that you can hang out with later (if you want to, of course!).
I have Get Your Guide links sprinkled throughout many of my Europe posts. I love going on their tours and doing their activities because they make it so easy! You can download the app, and all of your information is saved, including your QR code to get in. Plus, many of the activities are cancellable 24 hours in advance if something comes up.
8. Have the Right Credit Card (and Bring Cash!)
I’m just going to put this bluntly: One of the most important things about traveling solo is making sure you have your shit together. And that especially includes your money! Below, my top 2 tips for taking and spending your money abroad:
1. Get an International Credit Card
One of the worst things about traveling to Europe is coming back from the trip of a lifetime and realizing that you were charged a bunch of hidden fees because your credit card is not approved for international travel.
The best way to ensure you will not get charged hidden fees is to either search “travel credit card” and apply for one that offers travel benefits, or to make sure your credit card lists “no foreign transaction fees.”
If you are unsure, you can always call your credit card company and ask! The best part is a lot of these cards also come with plenty of travel perks, such as free or discounted flights, hotels, and activities when you redeem your points for travel!
Pro Tip: Although you are in Europe and everything is priced in euros, you will always get charged in American dollars. Your credit card statement will usually show you the price in euros and then the price you actually paid in dollars. This is not a transaction fee. This is the foreign exchange rate that applies to every traveler.
I have the travel credit card from Chase and love all the benefits I get. Some of my other friends that travel a lot have American Express, which supposedly has access to the best airport lounges. If you are looking for a travel card, those are the 2 I would recommend.
My Top Tip for Paying with A Credit Card Overseas
When you pay with a credit card, a lot of times you will get asked if you want to pay in dollars or euros. It is extremely important that you always pay in the currency of the country you are visiting! Not doing this will cause you to get hit with TWO foreign transaction fees, which will make your credit card bill more expensive.
2. Always Have Cash on Hand
In our virtual world, you might be thinking….“but why?” Hear me out.
Remember when I said you have to have your shit together as a solo traveler? This means you have to have a backup plan in case you get pickpocketed on the subway and your travel credit card that I just told you to apply for gets stolen.
You have to have a backup plan in case the credit card machines go down at the airport and you need a spicy marg to knock you out before your 9 hour flight home.
You have to have a backup plan in case that cute little cafe you’ve been eyeing all week doesn’t take credit cards. You feel me?
My Top Tip for Bringing Cash Overseas
In order to get the cheapest exchange rate, you have a couple options. Your best bet is likely to bring a debit card with you and get euros out at an ATM overseas – however, check with your bank first to see if they will charge you a fee to do this. Keep in mind, some of the ATMs may also charge a fee as well, but this will still likely be your cheapest option.
Your second option is to convert dollars to euros at your local bank before coming to Europe. However, most banks will unfortunately charge a fee for doing this. For example, Truist charges you a minimum of $20 any time you convert currency.
The airport is usually the worst place to exchange currency; they typically charge a higher conversion rate, which means you will end up paying way more money.
9. Beware of Pickpockets
Although traveling to Europe is generally very safe, the most common crime you will encounter is pickpocketing. I suppose it’s better than getting held up at gunpoint, but still. Getting pickpocketed and losing your money, ID, and/or passport is something that can absolutely ruin your trip.
I wrote a blog post titled The Best Ways to Avoid Pickpocketing in Barcelona that highlights some of the best tips and tricks to keep your belongings safe. Although it talks about places specific to Barcelona, I mention a lot of tips in this post that can be applied to any city or country to help you avoid pickpockets. A few things you will read about include:
- The best types of bags to carry,
- Unsuspecting people that are notorious for stealing
- The #1 thing that pickpockets will take out of your bag.
10. Be Open to Meeting (and Learning From) New People
Learning from Other Foreign Travelers
Remember earlier how I said to network before you go on your trip? I have learned a TON from meeting other travelers on my journeys and talking to them.
There’s nothing I love more than sitting at the bar having a glass of wine and chatting with someone who has seemingly been everywhere. I am fascinated.
Another reason I love talking to other travelers is because I feel like you can get a lot of misleading perceptions about places from the media. The media has an agenda. Other travelers usually do not. They are happy to offer you their personal experiences and insight because they get you.
Learning From the Locals
Sometimes, the people I have met are residents of the country I’m visiting and have given me some great tips and advice. Seriously – there’s nothing like learning from the locals!
The locals can tell you about the less touristy places that are popular amongst them, which can give you a more authentic experience. I have gone to hole in the wall bars, dance clubs, and cafes that I never would have known to go to otherwise just because I met a cool local who was keen on showing me around.
In fact, The Cool Local is one of the people I mention in my downloadable eBook, “The Six Essential People You Meet While Traveling Solo”
Now…I know what you’re thinking: “but what about stranger danger?!” See the next 2 sections 👇🏼
11. Trust Your Instincts
One of the things I get asked all the time is, “do you ever feel unsafe traveling the world alone?” My answer is always a resounding “NO!”
My feeling of safety is largely due to me being mentally and physically prepared every time I leave the country. However, it’s also due to me paying attention to my body and when it clues me in that a place or person isn’t safe.
Call me crazy, but your instincts will tell you so much, even when you are in a place that you’re completely unfamiliar with. I cannot stress the importance of paying attention to these instincts and feelings.
My Top Tips for Keeping Yourself Safe
These are things I do when I travel solo that have helped me stay out of danger:
- Walk with a purpose – Walking with confidence and purpose demonstrates assertiveness and doesn’t make you stand out as a target.
- Perfect your RBF – A lot of times, a RBF, or resting bitch face, is enough to make people not want to approach you
- Your tripod can double as a weapon – Sometimes I will carry my tripod in my hand (instead of my backpack or tote bag) if I feel like the people around me are sketchy
- Keep it moving – If I am walking and I hear “ma’am, can I ask a question?” – the answer is always me continuing to walk away. I have found people either want money or some other distraction. This always makes me feel like I’m about to get pickpocketed or worse, so I don’t entertain the possibilities.
- Carry a whistle alarm you can press if you are in danger.
- Bring a backup phone charger with you
- Download the map of your current city to your phone so if you wouldn’t have signal, you would still be able to use it (you can do this on Google Maps!)
12. Set Your Boundaries
It is OKAY to be standoffish – or, if the situation calls for it, even a little rude – if you feel unsafe. I have set unwavering boundaries for myself as a solo traveler that I am not afraid to tell other people about.
In fact, “boundary” is one of my favorite words that I use to get my point across when someone is being too pushy. I have found that this word helps me to be assertive without being mean.
For example: “As a solo traveler, I do not go in people’s hotel rooms or have them come back to mine. That is a boundary for me.”
This is a line I have had to use more than once. If the person continues to be pushy, I have no problem being more assertive or even leaving. You have to protect yourself, and that starts with not putting yourself in a position where bad things can happen.
Figure out what you are comfortable with and what you are NOT comfortable with, and stick to your guns.
13. Tips for Navigating a Foreign Language
A lot of people get major anxiety about traveling to a foreign country because they can’t speak the language. In this case, I use a translator app!
I use Google Translate to help me because it has the following features:
- Text: Enter the language you are typing in and the language you want the text converted to, and the app will translate for you
- Speak: Press and hold the microphone button and speak into the app in English. The app will translate what you say into the language that you pick.
- You can also have someone speak the foreign language into this app and it will translate it into English for you.
- Camera: Select this option and hold your phone up to the text that you are trying to translate and it will display it in English!
- Note: I use this a lot when I am looking at restaurant menus. However, I feel like this is the option I have the most trouble with. Depending on how things are written, sometimes they will not translate literally. A lot of places will have a menu in English that you can ask for.
Since English is the “universal language,” some places will have things written in English on signs and other public advertisements. For example, if you are in Spain, there could be a sign in a store that says “Baños” in large letters with “Restrooms” written in a smaller font underneath.
You would be surprised how easy it is to pick up on certain words in a foreign language just because of the context you see them in!
For example, in the photo below, you’ll notice a sign that says Carrer de Jaume on the side of the building. Eventually, you figure out this word means “street” because you see it on many of the buildings near alleyways and intersections.

Thank You For Visiting!
I hope you enjoyed this post! If you have questions, please comment below & I will respond. If you found this post helpful, please share with your friends or on social media. For more photo inspo, follow my Instagram!
Lastly, if you’re reading this, you’re the reason I get to live my dream. Thanks for letting me show you the world 💕


